Form validation
Before we add validation to any form with jQuery, we need to remember one important rule: client-side validation
is not a substitute for server-side validation. Again, we cannot rely
on users to have JavaScript enabled. If we truly require certain fields
to be entered, or to be entered in a particular format, JavaScript
alone can't guarantee the result we demand. Some users prefer not to
enable JavaScript, some devices simply don't support it, and a few
users could intentionally submit malicious data by circumventing
JavaScript restrictions.
Why then should we
bother implementing validation with jQuery? Client-side form validation
using jQuery can offer one advantage over server-side validation: immediate feedback.
Server-side code, whether it's ASP, PHP, or any other fancy acronym,
needs the page to be reloaded to take effect (unless it is accessed
asynchronously, of course, which in any case requires JavaScript). With
jQuery, we can capitalize on the prompt response of client-side code by
applying validation to each required field when it loses focus (on blur), or when a key is pressed (on keyup).
Required fields
For our contact form, we'll check for the required
class on each input when the user tabs or clicks out of it. Before we
begin with this code, however, we should make a quick trip back to our
conditional text fields. To simplify our validation routine, we can add
the required class to the<input> when it is shown, and remove the class when the<input> is subsequently hidden. This portion of the code now looks like this:
$thisInput.prev('label').find(':checkbox')
.attr('checked', false)
.click(function() {
if (this.checked) {
$thisInput.show().addClass('required');

$thisFlag.show();
$(this).parent('label').addClass('req-label');
} else {
$thisInput.hide().removeClass('required');

$thisFlag.hide();
$(this).parent('label').removeClass('req-label');
}
});
With all of the required
classes in place, we're ready to respond when the user leaves one of
these fields empty. A message will be placed after the required flag,
and the field's<li> element will receive styles to alert the user through class="warning":
$(document).ready(function() {
$('form :input').blur(function() {
if ($(this).hasClass('required')) {
var $listItem = $(this).parents('li:first');
if (this.value == '') {
var errorMessage = 'This is a required field';
$('<span></span>')
.addClass('error-message')
.text(errorMessage)
.appendTo($listItem);
$listItem.addClass('warning');
}
}
});
});
The code has two if statements for each form input on blur: the first checks for the required class, and the second checks for an empty string. If both conditions are met, we construct an error message, put it in<span class="error-message">, and append it all to the parent<li>.
We want to give a slightly different message if the field is one of the conditional text fields—only required when its corresponding checkbox is checked. We'll concatenate a qualifier message to the standard error message. To do so, we can nest one more if statement that checks for the conditional class only after the first two if conditions have been met:
$(document).ready(function() {
$('form :input').blur(function() {
if ($(this).hasClass('required')) {
var $listItem = $(this).parents('li:first');
if (this.value == '') {
var errorMessage = 'This is a required field';
if ($(this).hasClass('conditional')) {
errorMessage += ', when its related ' +
 'checkbox is checked';
}
$('<span></span>')
.addClass('error-message')
.text(errorMessage)
.appendTo($listItem);
$listItem.addClass('warning');
}
}
});
});
Our code works great the
first time the user leaves a field blank; however, two problems with
the code are evident when the user subsequently enters and leaves the
field:
If the field remains blank, the
error message is repeated as many times as the user leaves the field.
If the field has text entered, the class="warning"
is not removed. Obviously, we want only one message per field, and we
want the message to be removed if the user fixes the error. We can fix
both problems by removing class= "warning" from the current field's parent<li> and any<span class="error-message"> within the same<li> every time the field is blurred, before running through the validation checks:
$(document).ready(function() {
$('form :input').blur(function() {
$(this).parents('li:first').removeClass('warning').find('span.error-message').remove();

if ($(this).hasClass('required')) {
var $listItem = $(this).parents('li:first');
if (this.value == '') {
var errorMessage = 'This is a required field';
if ($(this).hasClass('conditional')) {
errorMessage += ', when its related checkbox
is checked';
}
$('<span></span>')
.addClass('error-message')
.text(errorMessage)
.appendTo($listItem);
$listItem.addClass('warning');
}
}
});
});
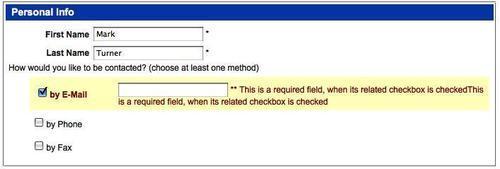
Finally, we have a
functioning validation script for required, and conditionally required,
fields. Even after repeatedly entering and leaving required fields, our
error messages now display correctly:
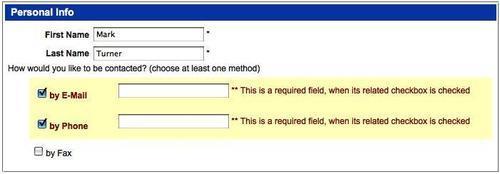
But wait! We want to remove the<li> element's warning class and its<span class="error-message">
elements when the user unchecks a checkbox too! We can do that by
visiting our previous checkbox code once more and getting it to trigger blur on the corresponding text field when its checkbox is unchecked:
if (this.checked) {
$thisInput.show().addClass('required');
$thisFlag.show();
$(this).parent('label').addClass('req-label');
} else {
$thisInput.hide().removeClass('required').blur();

$thisFlag.hide();
$(this).parent('label').removeClass('req-label');
}
Now when a checkbox is unchecked, the related warning styles, and error messages, will be out of sight and out of mind.